Basic cheeseburgers can be one of the easiest dinners you make for yourself or your family. The Juicy Lucy cheeseburger, however, is one of the more complicated burgers to pull off.
The Juicy Lucy, a cheese-stuffed burger, is known to have originated in Minnesota. Two restaurants, Matt’s Bar and the 5-8 Club, take ultimate credit for the specific take on the American classic.
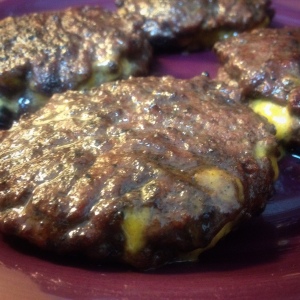
I’ve cooked Juicy Lucy burgers on the stovetop before, but until last week I had never tried them on the grill. I worried a bit about all the cheese melting out while cooking on a grill top over an open flame. Some of the cheese did melt out, but not nearly as much as I expected.
There are a few keys to cooking a Juicy Lucy, particularly on a grill. We’ll share the whole cooking process below, but here are a few important tips that stand out.
- Be sure you tightly seal your two patties together around your cheese to help keep the cheese in the middle as it melts.
- Be sure to chill your Juicy Lucy-prepped patties in the fridge for a while prior to putting them on the grill. That further keeps your cheese tightly sealed.
- Don’t plan to turn your burgers more than a time or two while they’re on the grill. The more you turn them, the more likely you’ll start to tear up your meat and leak your cheese from the center.
- You’ll want to make your patties as thin as possible so they cook quickly and get done before your cheese melts enough that it wants to leak into the grill.
- If your cheese does begin to leak, you will likely experience flame-ups if you’re using a charcoal grill. Be prepared to put out those fires.

Here’s what you’ll need to make your Juicy Lucy Cheeseburgers. These amounts will be enough to make four quarter-pound burgers.
1 pound of fresh ground beef of your choice
1 block of Cheddar (or your favorite) cheese to slice fresh
Marinade of your choice (we used a half cup of Worcestershire sauce and pinches of salt and pepper on each patty)
4 buns
Condiments and toppings of your choice

Directions
- Make eight equal patties from your ground beef and coat as you wish with your marinade.
- Slice your cheese thin and form it into stacks of two or three pieces each.
- Stack slices of cheese (not too thick) in the middle top of one of the patties.
- Cover that patty with another patty.
- Crimp the edges of the two patties together to seal them together and envelope the cheese.
- Repeat the process with the other patties to prepare four total Juicy Lucy cheeseburgers.
- Put your burgers on a plate and cover with tin foil. Place them in the fridge while you prepare your grill. Allow the burgers to chill for at least 20 minutes to help further seal the burgers and the cheese inside.
- Have your grill hot before you put the burgers on the grill top. Allow your burger to cook well on one side before you flip it to allow the seal to strengthen between the patties. You’ll be able to slightly pull up the side facing down with a spatula to check on the doneness of one side before you flip the burger.

- Once you flip the burger and have your patty done on both sides, be sure, as you would with any cheeseburger cooking, to be sure your juices are running clear.
- By this time, you will also likely have cheese running out of the burger. As long as you don’t have too much cheese leaking out to lose much, you’ll be in good shape.
- Put your burgers on your buns and serve with the toppings you choose.

Matthew’s Take: I’ve made Juicy Lucy Cheeseburgers on the stove, but the taste of these grilled burgers by far tops anything I’ve ever attempted. The difficulty level also tops anything I’ve ever attempted with a burger, not because the steps are difficult, but because it requires some planning and precision to ensure your burgers are ready to stand firm against the grill without leaking out all the cheese. You will likely have cheese leakage because I did, too. But there was still a nice layer of cheese in the middle of the burgers. It was a smart move to patty the meat thin because it helped the meat cook better in the center with the cheese in the middle, too. I’ve been told at restaurants that serve the Juicy Lucy to expect a pink center because the burger is so thick it doesn’t cook to the center. At home you can control that factor. I give this Juicy Lucy Cheeseburger an A+ for taste and an A for cost. But I give it a C for ease because it does take some patience and practice.
Molly’s Take: These cheeseburgers were truly Juicy and delicious. It was so awesome to find a cheesy surprise in the middle of my burger. The cheddar was a great choice, too. I do think they’re harder to make than some, but not impossible. And Matthew did a great job, especially on the grill. I was also glad he made sure they weren’t pink on the inside, as I’m not a fan of pink/under-cooked burgers or meat. I give this burger, and Matthew, an A+. Give them a try if you’re adventurous! And especially if you love cheeseburgers, like we do.
